Saturday, October 29, 2016

Thankful in 2016

As I'm sitting here thinking how I could start my blog again after a three-year hiatus, I realize we are nearing the end of the year 2016 and I can't believe it's almost ending.  This year, with all its ups and downs, all I can say is that God still remains faithful.

This is yet another time of the year where things change; seasons change, temperatures and the climate changes, but one thing remains the same ... God.  Through every season of change in my life there has always been one constant.  How do I know that God remains unchanging? Still the same God he proclaims to be in his word? That he is the same faithful God who hears our prayers? That he knows the hopes and desires of our hearts and the best timing for everything?  I know because "I have tasted and seen".

This year has been a year of stepping out in faith, and believing God will provide in his perfect timing.  Since the beginning of 2014, my husband and I set out on attempting to buy our first home. The test proved daunting.  We fell in love with many homes, just to see them removed from the market just as soon as we would have placed a bid on them.  With the birth of our second child, we decided to take a break from househunting. Then, in the beginning of 2015, we continued our search once again.  At the end of 2015 (September to be exact) we placed a bid on a home that we had been eyeing for about a year but had not been placed on the market yet, since it was in foreclosure.  Our offer was accepted, and we were extremely excited, only to find out that shortly after our bid was accepted, the home had been broken into and some damage was done. After seeking repair so that we could continue with the purchase, it took us six months to finally get the home.

And looking back, I'm so thankful that God was patient enough with us to teach us to be patient, prayerful, and wait on him and to learn again that he knows what is best for us.  Sometimes we can so easily get caught up into what we want, that we forget to see that God wants to do things a little bit differently than we have planned.  Subconsciously we find ourselves dying to Christ, and living for self instead of dying to self and living for Christ ("For Christ’s love compels us, because we are convinced that one died for all, and therefore all died. And he died for all, that those who live should no longer live for themselves but for him who died for them and was raised again." (‭2 Corinthians‬ ‭5‬:‭14-15‬ NIV))

So, as this year draws to a close, I urge you to look back and find reasons to be thankful to God for where you are in your life, no matter if you are in the valley, or if you're in a place of blessing, if you're in a place of peace or in the eye of the storm, ask God to help you find the good in whatever situation you are in.

I'll leave you with "Thank You God" by Chris Tomlin:


Sunday, June 26, 2016

Up to Speed 2016

Hello everyone.  Been a few years ...yeah I know, I know.  I haven't been around here much, but life has been CRAZY.  Let me see, well ...

 Sometime in the beginning of 2014 I was beginning to have slight health issues.  I mean, nothing major except the doctor (and by Doctor, I mean his Nurse Practitioner) couldn't diagnose me correctly.  From possible thyroid issue to possible UTI ... I was put on a bout of antibiotics ... after about 3-4 months, lo and behold, I find out I was 3-4 months pregnant ... yeah, baby 2 was on the way.  Add to that we were looking to sell our place and buy a new one, but now we NEEDED a new one!

"Oh the joys of buying a new home", they said.  "It's gonna be such an adventure", they said.  A joy it was not, and it wasn't so much an adventure as it was an emotional roller coaster.  Add into that pregnancy hormones ... well God bless my husband for the tears he had to endure.  We contracted a realtor for 6 months to sell our home.  I saw more squirrels in my yard than I did people coming through to see it.  Contract ended, baby #2 had arrived and we took about a few months off of home buying to keep our sanity in tact.  


March of 2015, we started looking again for our new home and seen at least 5-6 homes we really liked, but needed to sell our home in order to be able to make the transaction.  September 2015 we put in a bid for the house of our dreams and it was accepted!! However, it took 6 MONTHS to finalize the sale since the home was vandalized days after our bid was accepted.

December of 2015, I listed our home for sale on Zillow.com as SALE-BY-OWNER just to see if we would get any bites and the calls came rushing in.  February 17, 2016 we sold our home.  February 29, we signed for and received keys to our new home!


It has been a bitter-sweet journey, but now we are elated.  We are in our new home and enjoying every minute of it.  Major projects have been completed and now we are preparing for our house warming party.

Through it all, GOD has been faithful.  (I even have a prayer room!)  But more on that later.  There are so many new things happening, but I just wanted to let you all know I'm back and excited to share what creative things God inspires me to share. 

Take care, God bless and stay tuned for what's next. 😉

Sunday, November 17, 2013

Gratitude and Gobble Gobble Baby Beanie Hat

I know ... it's been a long time since I last posted.  Life has been very interesting.

Watching my little one grow and begin to say things like "Mama" and "Dada" has totally overwhelmed me.  She's growing so fast, it blows my mind.  She crawls soldier style, cries for her Daddy if she gets hurt, makes the cheesiest smile when she learns to do something for the first time or when she does something that causes anyone to smile or laugh.  She cries "Mama" when she's tired or hungry.  She's been saying "Duch" to call our 6 year old girl (Dutchess, our Lemon Basset Hound and been saying "Jaya" to call her cousin Josiah ... all this and she's only 10 months!!  It's amazing that I can't ever remember life without her.

As I think back, I can't help but be grateful to God for all the blessings He has poured out on my family and me.  There is not a thing in my life that I am not grateful for; the bad because it molds my character and teaches me how to work at relationships; the good because it gives me peace and rest from times of trial. Through all things, I've learned to be grateful, even though (at times) I may not understand some of the things I go through.

With this said, I'd like to share this song: "Gratitude" by Nichole Nordeman.  It reminds us to be grateful even if what we are hoping or expecting doesn't come to pass as we would like it to ... but, maybe God has a better plan, maybe He knows what we really need.  May we have peace with what God does in our lives and may we ALWAYS be grateful for ALL He does and that we can learn to trust Him.


I'd like to share this pattern I've been working on for my baby for Thanksgiving.  The pattern fits 9-12 months.  Hope you enjoy!


Gobble Gobble Baby Beanie Hat

Materials:
            Redheart Yarn: Super Saver
                        Coffee
Café Latte               
                        Buff
                        Black
White
                        Hot Red
                        Gold
                        Carrot
                        Spring Green
            Needle: USH8/5.00 MM

GOBBLE GOBBLE HAT

Using COFFEE:
Start off with Magic Ring (mr)
1. Ch 2 (this is the first dc), 9 dc, sl st to join. – (10 sts)
2. Ch 2 (this is first dc), 1 dc in same st, 2 dc in remaining 9 sts, sl st to join. – (20 sts)
3. Ch 2, 2 dc in next st, [1 dc in next  st, 2 dc in next st] repeat from [ to ] 8 times, sl st to join. – (30 sts)
4. Ch 2, 1 dc in next  st, 2 dc in next st, [1 dc in next  2 sts, 2 dc in next st] repeat 8 more times, sl st to join. – (40 sts)

Change color to CAFÉ LATE:
5. Ch 2, 1 dc in next 2 sts, 2 dc in next st, [1 dc in next 3 sts, 2 dc in next st] repeat 8 more times, sl st to join. – (50 sts)
6. Ch 2, 1 dc in next 8 sts, 2 dc in next st, [1 dc in next 9 sts, 2 dc in next st] repeat 4 more times, sl st to join. – (55 sts)
7. Ch 2, 1 dc in next 54 sts, sl st to join. – (55 sts)

Change color to BUFF:
8-15. Repeat step 7.
Bind off.

EAR COVERS ON BEANIE
Using BUFF:
Make sure top of hat is facing down, mark 11 sts to left and 16 sts to right of bind off st.
1. Slip st in one of the marked off sts, ch 2, 1 dc in next 5 sts, ch 1, turn.
2. Skip first st, dc in next 4 sts, ch 1, turn.
3. Skip first st, dc in next 3 sts, ch1, turn.
4. Skip first st, dc in next 2 sts, ch 1, turn.
5. Skp first st, dc in next st. Bind off.
Repeat step 1-5 for the other marked off st.

Measure out 18” of COFFEE, CAFÉ LATE and BUFF yarn. Thread all three strands through tip of EAR COVER.  Match up each strand with it’s matching color so that there are three strands and braid all the way down.  When you are close to the end, tie a knot.  Repeat on the other EAR COVER.  Trim loose strands.

MOUTH
Using HOT RED:
Start using Magic Ring (mr)
1. [3 sc, ch 2] repeat once more, 2 sc, ch 2, sl st to join. (creates 3 sides)
2. [1 sc in next 3 st, 2 st in next 2 st space] repeat once more, 1 sc in next 2 sts, 2 st in next 2 st space, sl st to join. Bind off.

Repeat 1-2 using CARROT or GOLD (I used CARROT).

Overlap CARROT mouth piece (for the beak) over the HOT RED piece, then stitch to beanie.

EYES
Using BLACK:
Start using Magic Ring (mr)
1. Ch 2, 9 dc, sl st to join. – (10 sts)

Change color to WHITE:
2. Ch 2, 1 dc in same st, 2 dc in remaining 9 sts, sl st to join.  – (20 sts)
3. Ch 2, 1 dc in same st, 1 dc in next st, [2 dc in next st, 1 dc in next st] repeat 8 more times, sl st to join. – (30 sts)

Repeat step 1-3 for other eye.

FEATHERS
Colors needed: Hot Red, Gold, Carrot and Spring Green
1. Ch 7.
2. Dc in 2nd st from needle, dc in next 3 sts, 1 hdc in next st, 1 sc in next st, ch 2.
3. Turn piece and stitch on other side of chains. 1 sc in first st, 1 hdc in next st, 1 dc in next 4 sts. Bind off.
Repeat step 1-3 in all 4 colors, then stitch feathers to top of beanie using COFFEE yarn.

Sew in loose ends

*** You may make and sell products from my patterns but if you do I ask that you link back to my post. Please do not copy and post this pattern and claim it as your own. Please do not re-publish photo's as your own.***

Monday, August 26, 2013

Coconut Custard - "Flan de Coco"

I wanted to share a recipe my family and I have come to love. This is something I usually make during the Holidays and it's always eaten up immediately. It's FLAN DE COCO or Coconut Custard. (This recipe makes 2 custards - 24 servings.)

Ingredients:


1 can Cream of Coconut
1 can Evaporated Milk
1 can Sweetened Condensed Milk


1/2 cup sugar
2-3 drops vanilla extract or lemon juice
1/4 cup of water


5 large eggs

Materials:


2 - 13" Cake pans (for double boiling in the oven [baño de Maria])
2 - 8" round cake pans (for the flan)
Non-stick pan
Metal spoon
Cake Mixer
Spatula
Oven

Instructions:

PREPARE CARAMEL

1. Pour sugar and water into non-stick pan and heat at med-high temperature.


2. Add 2-3 drops of vanilla extract or lemon to the pan.


3. Stir the caramel mixture with a metal spoon since it will get very hot (plus it's easier to clean up later).


4. Heat mixture for 10-13 minutes ...


... until mixture caramelizes to a golden brown.


*****WARNING! Caramel will be extremely hot. Handle with care.*****

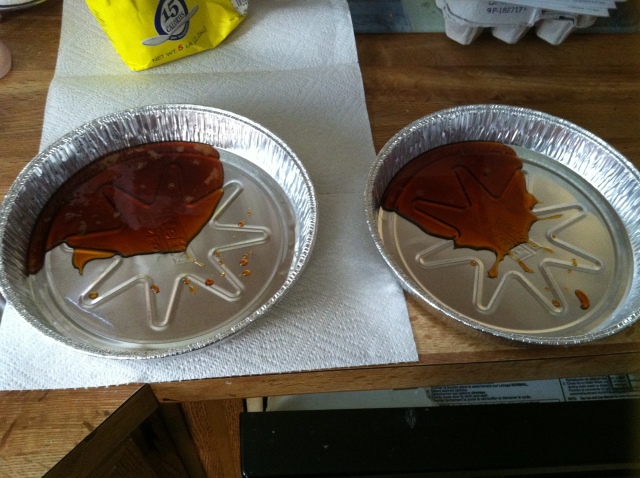
5. Place 8" round cake pans on a safe surface (not on a plastic surface or on top of a plastic table cloth since the caramel will heat the pans and can melt any surface it is on). Then pour half of the mixture in one pan and the other half in the other.


6. Take the pans while the caramel is hot and roll the pans to allow the caramel to spread evenly on the bottom.


xxx TIP: To Clean Pan and Metal Spoon xxx

+ Fill the pan with soap and water and place over low heat. Fold some paper towel and place in pan and use metal spoon to slowly stir around the pan to clean up excess caramel. Then place in the sink under cold running water to cool down.


PREPARE CUSTARD

1. Preheat the oven to 350° F.


2. Place eggs into mixer and mix until creamy.


3. Add Sweetened Condensed milk to mixer.


4. Fill can of condensed milk half full WITH WATER and pour into mixer.


5. Add Cream of Coconut to mixer and mix.


6. Add can of Evaporated milk to mixer and mix.


7. Now that the custard is mixed, pour evenly into both round pans on top of the hardened caramel.


8. Place rectangular pans into the oven.


9. Carefully place the round custard-filled pans into the rectangular pans.


10. Now carefully pour water into rectangular pans and fill to 1/4" below rim of round pan.


11. Bake custards for 40 minutes and test with a toothpick to make sure the custard is ready. If the toothpick comes out clean, it's ready to cool. If not, bake for an additional 10 minutes.

12. When custard is finished baking, place on a cooling wrack for about an hour ...


... then place in the refrigerator over night.

13. Flip over onto a flat plate for presentation (caramel on top) and serve.

¡Buen provecho! (Bon Appetit)

Monday, August 5, 2013

How to Increase Milk Supply for Breastfeeding Moms

As many of you already know, I'm a first time mom. When I found out I was pregnant, I already decided that I wanted to exclusively breast feed (EBF) my LO (little one). I don't know anyone personally who has breastfed their LO's after going back to work, so I began searching on Babycenter.com and reading what has worked for other EBF moms.

I was recently asked how I was able produce more milk before going back to the workforce and decided I should share what has worked for me.

My answer: FENUGREEK (speak to your physician or Lactation Specialist to see if this is right for you).

Here's what you'll need:


Fenugreek Tea Bags


Fruit Punch Drink Mix (I only use half a serving - the full serving is too sweet for me).


16 oz bottle of water


Remove 6 oz from the bottle and bring to a boil. (If you have a Keurig, use that to heat your water.)


Place 3 Fenugreek Tea Bags inside an empty cup.


(Here I'm using my Keurig to add hot water for my tea.)


Stir the tea bags then set aside and let it steep for 12 minutes.


Pour Fruit Punch mix into the bottle. (I prefer the Fruit Punch mix better than any other because it's the only one that best masks the bitterness of Fenugreek. You can experiment with other flavors if you don't like Fruit Punch with your Fenugreek. The taste takes some getting used to.)


Remove the tea bags from the cup and pour the tea into the water bottle. Place the lid on the bottle, shake and refrigerate.

You need to drink 3 bottles per day to see results.

It took me two days of taking Fenugreek to see any real difference in my milk production. Hopefully this works for you. Use Fenugreek together with power pumping (pumping every 1 - 2 hours) for best results.


If you try this, I would like to hear from you. Did this work for you? What other flavors did you experiment with? Hope to hear from you!

Wednesday, June 26, 2013

Having a hoot making these Pinterest-Inspired owl motifs.

It's been some time since I've been on Pinterest, but recently I went by and pinned so many awesome project ideas.  I love to figure out how to make some of the things I've pinned and write down patterns (so I don't forget how I made them in the first place).

My Pinterest -> http://pinterest.com/craftymama2013/

I recently ran into an owl motif that caught my attention and this is my version of it:


Here is the pattern I came up with.  Hope you enjoy!!

OWL

Start off using a crochet Magic Ring (mr)

1. Using color 1 -> 2 ch (this counts as first dc), Dc 7 in ring. Sl st with Color 2 to join. (8 st)
2. Sl st 8. (8 st)
3. Using color 1 -> Stitch into st from row 1 -> 1 ch (this counts as first sc), 1 sc in same st, 2 sc in each st to end of row. Sl st with Color 3 to join. (16 st)
4. 2 ch (this counts as first sc followed by 1 ch), [1 Sc, ch 1], repeat to end of row. Sl st to join. (16 hdc)
5. Sl st between next two posts, ch 1 (this counts as first sc), 1 sc in between same posts. 2 sc. In between each post to end. Sl st with color 4 to join. (32 st)
6. Sl st between posts from row 4, ch 2 (this counts as 1 dc). 1 dc in between same posts. 2dc in between each of the posts of row 4 to end. Sl st to join. (32 dc)
7. 1 ch (this counts as first sc). 8 sc, ch 1, turn. (9 st)
8. Skip first st, 8 sc across, ch 1, turn.
9. Skip first st, 1 sc, ch 2, 2 sc in same st, 2 sc, 1 sl st, 2 sc, 2 sc in next st, ch 2, 1 sc in same st. 2 sl st down side and bind off.

EYES (make 2)

Using white:
Start off using a crochet Magic Ring (mr)
1. 6 sc in ring, sl st to join, ch 1, bind off (leave center loose, do not tighten yet).
Using black:
2. Tie 3 knots on each other. Insert this through the center of the white part of the eye (this becomes the pupil). Tighten the mr. Leave some yarn attached to attach eyes onto owl.

BEAK

Using orange:
Start off using a crochet Magic Ring (mr)
1. Ch 2 (this counts as first dc), 2 dc in same ring, ch 1. Tighten mr. Leave some yarn attached to sew beak onto owl.

*** You may make and sell products from my patterns but if you do I ask that you link back to my post. Please do not copy and post this pattern and claim it as your own. Please do not re-publish photo's as your own.***

**/ See some completed projects on Ravelry.com /**
http://www.ravelry.com/patterns/library/owl-motif-2/people

Friday, June 7, 2013

Baby bullet crazy!!!

My baby turned four months three weeks ago and I purchased the Baby Bullet.  I never realized how fun it could be to make purées for a baby.  I started off making sweet potato purée, then a couple of days ago I made carrot purée.  (I'm a newby at this so forgive me if I sound excited!!). I'm so psyched that with one sweet potato I can make enough baby food for 5 to 10 days.  I already have two bags of frozen baby food in my freezer.

All this puréeing got me thinking ... hmmm!  What can I make for myself that's healthy?  So I started experimenting around my kitchen.  First I puréed a cup of watermelon and swallowed it in like two seconds.  Then I puréed two bananas.  (That was like two days ago.)

This morning I was tired of eating cereal and milk so I decided I wanted to make pancakes.  This is what I came up with.

Banana purée pancakes with strawberry purée topping.

This is how you can make it:
(Makes 1-2 serving)

One banana
3/4 cups of water
One cup of pancake mix (The kind where you only need to add water)
3 medium to large strawberries

Tools you'll need:

Blender (Baby bullet preferred)
Frying pan and spatula
Measuring cup
Pam or butter

How to make:

1.  Break up banana into pieces then add the banana and water into the blender and purée.
2.  Add the pancake mix and purée.
3.  Coat your frying pan with butter or Pam and make the pancakes.

For the strawberry topping:

1.  Chop all 3 strawberries into four pieces each then add to the blender (or baby bullet) and purée.
2.  Pour the puréed strawberries over your pancakes.
3.  ENJOY!!  I sure did!
    A cheerful heart is good medicine, but a crushed spirit dries up the bones.
    Proverbs 17:22

Crazy Weather ... Need a Slouchy Hat?

Wow, it's been quite some time since I last wrote. (Crazy!)

Much has transpired since. I took part in the 2nd annual Praise Explosion event and I had such a great experience. It was great just being able to participate with the youth at an event that reaches out to the community. By the looks of it, the event had an even greater turnout than last year.

This is me doing sound check.


I can't believe on Memorial Day weekend here in Jersey (NJ) we were getting cold weather brrrr!! I'm learning you can't really trust the weather forecast anymore.

With that in mind (although I know warm weather is upon us), I thought I'd share with you a pattern I found online to give you a head start on fall (although summer is not yet quite here ... Hmmmm ... Oh well. Enjoy!!!

Visit this link for the pattern -> Slouchy Hat

This is me wearing the hat.

Friday, May 3, 2013

Praise Explosion Concert - You Won't Want to Miss It for the World

I thought I'd share this.

I was invited to participate in the second annual PRAISE EXPLOSION concert that will be held in my hometown. Yay!

I participated last year and it was an amazing experience. Of course, I was a bundle of nerves when I had to take part, but afterwards I was able to enjoy all the amazing performances and admire the talent of everyone who performed and ministered.

This year will be just as powerful. There is such a dynamic line-up and the majority of those participating are youth. (I always have a special place in my heart for the youth. I had the privilege of being youth president at my church for 7 years in a row and always admired their passion.)

The event is being promoted by Predestined Ministries (Facebook: https://www.facebook.com/PredestinedMinistries) and Higher Places Ministry (Facebook: https://www.facebook.com/pages/Higher-Places-Ministry/110346822386427)

If you're interested in knowing who will be taking part, most are tagged in the following video:

https://www.facebook.com/photo.php?v=646617992022081

I'm excited that through our combined efforts, we can come together to create an atmosphere of praise and just worship the Lord.

And yes, there will also be food and prizes, so don't miss it!

Saturday, April 27, 2013

Oh Yes ... I Boldly Went There!

Last weekend I was able to do everything on my to do list.  I took my baby with me to get the oil changed in my car and she was such a delight (especially since the oil change only took 20 minutes).

I was able to finish crocheting Minnie Mouse hat and diaper cover.  I also created a tube top for my baby to wear during her photo shoot.  She did so well.   We received a few pics already from the photo shoot.  


I'll post a pic of the Minnie Mouse outfit when I get the final pics.

I'm developing a crochet pattern for the sneakers that my husband's cousin from Florida requested.  This is what I developed so far.


This was my first attempt at the sneakers.  I have a few tweaks to do before I finalize the pattern.

Right now, my husband and I are at a Star Trek Convention in NJ.  (Yeah, we are Trekkie's.) And (Wow) we just had our pictures taken with Gates McFadden, better know as Beverly Crusher on Star Trek: Next Generation.  


To be quite honest with you, I'm a bit of a newbie at this "Trekkie" thing.  My husband is the true Trekkie and he's made a fan out of me.  Hey, maybe my next freebie pattern will be something related to Star Trek.  Let's see!

Psalm 143:5
I remember the days of long ago; I meditate on all your works and consider what your hands have done.

Thursday, April 18, 2013

Thank goodness for three-day weekends!

As a first-time mom I really have my work cut out for me.  I love planning for things, but as a first-time mom I realize that my planning needs a little bit more coordination.  (I have to give props to moms who have more than one kid and manage to get things done!)

This weekend I'm planning to:

- Take the baby with me to get the oil changed in my car.
- Finish crocheting the Minnie Mouse hat and diaper cover for my baby's Photoshoot. (Idea from RepeatCrafterMe.com - Mickey and Minnie Mouse hat - Mickey and Minnie mouse diaper cover). So far this is my progress:

Here is my baby girl modeling her Minnie Mouse hat

- Take my baby to her three-month photo shoot at Reel Photography Studio.
- Start working on a crochet pattern for a pair of sneakers requested by my husband's cousin in Florida (Let's see how that goes :-/ ... Lol!)
- Then what better way to end the weekend then by singing praises to the Lord at Sunday service.  A great culmination to a busy weekend.

I hope you enjoy your weekend. Stay safe and be blessed.

Psalm 143:5
I remember the days of long ago; I meditate on all yourworks and consider what your hands have done.

Saturday, April 13, 2013

Cupcake Binkie Clip

When I was writing the pattern for my cupcake design (If you haven't seen it yet you can check it out here -> Cupcake Pattern ), I ended up creating more cupcakes than I knew what to do with.  I created so many in hopes that I could perfect the pattern.

Well today I dressed my baby in a beautiful turquoise outfit, which happened to match the color of one of the cupcakes that I made.  Seeing that the Easter bunny Binkie clip that I created for her was in need of cleaning, I realized she needed another one. (By the way these Binkie clips help me to prevent losing or misplacing her pacifiers all the time like I used to.). So I took one of the extra cupcakes that I had laying around, stitched up a chain cord and attached it to her pacifier ... and this is the end result ...

I would love to see what kind of ideas you come up with for this cupcake pattern.  And I love hearing your feedback.  Don't forget to leave your comments.

Saturday, April 6, 2013

Cupcake Pattern


I realize in our family that spring is a busy time for celebrations, and most of them are birthdays.  So I came up with an idea to gift to those who will be celebrating a birthday.  This is a cupcake pattern that I created.  I think it would be a great idea to make a keychain out of it.


What you'll need:
- a brown and colorful yarn (You can use any bright color to do the frosting)
- Scissors
- Place marker
- Crochet needle (5 mm)

CUPCAKE BOTTOM.

Start off using a crochet Magic Ring (mr) 
(see the following tutorial video to learn how:  http://www.youtube.com/watch?v=sLUaywX0-WE)

1) 6 sc
2)  2 sc in each st (12 st)
3) (1 sc, 1 sc, 2 sc in next st) repeat to end. (16 st)
4) 16 sc on back side of loop of stitch (16 st)
5-6) 16 sc
Sl st in next st and bind off

CUPCAKE FROSTING

Start with Magic Ring

1) 6 sc
2) 2 sc in each st (12 st)
3) (2 sc in each st) repeat to end (24 st)
4) (1 sc, 1 sc, 2 sc in next st) repeat to end, sl st in outside loop (facing you) of next st. (32 st)
5) Ch 2, 1 sc in same outside loop, then (2 sc in each outside loop of st) repeat to end, sl st to join (64 st)

(Connect Frosting to Bottom)

6) Starting from the frosting, put needle through first INSIDE loop (away from you) of stitch from the previous row (you just finished working on the OUTSIDE loop of the stitch).  Put needle through a stitch on the last row of the Cupcake Bottom piece, yo, and pull yarn completely through.

7) Skip one loop on the FROSTING piece and insert your needle, then put needle through the next st on the BOTTOM piece (do not skip a st on the bottom piece), yo, and pull yarn completely through.  Stuff the piece then continue this until the end.  
Sl st to finish row and bind off.  
Hide loose ends using a tapestry needle.

*** You may make and sell products from my patterns but if you do I ask that you link back to my post. Please do not copy and post this pattern and claim it as your own. Please do not re-publish photo's as your own.***